Want to speed up lead generation and close more deals from your Facebook Lead Ads? This is the guide for you.
Running Facebook Lead Ads sounds easy enough, right? Create the ad, set the targeting and budget, click Publish, and watch the leads roll in.
Except, that’s not always how the story ends.
Deciding how to follow-up in email, waiting for responses, adjusting your workflows, and facing the fact that no one sees the emails you worked so hard to put together … only to end up paying $20 for an unqualified lead.
Not the best feeling.
So how do you create a fantastic follow-up that generates leads? Easy, you send a text.
Why follow-up with SMS over email?
People today are becoming more accustomed to receiving texts from a business. Whether it’s for customer support or lead generation, you can follow-up with new leads right away, on a channel where they open all messages within three minutes of receiving.
With SMS Marketing software, you can build more sophisticated campaigns where text is the powerhouse, nurturing and converting new leads faster.
Marketers who use text with their Facebook Lead Ads experience a few key advantages, including:
- More people see and open an SMS message compared to email.
- The response rate for SMS marketing is 45% vs. an email response rate of 6%.
- It takes the average person 90 seconds to respond to a text message.
- 75% of people wouldn’t mind receiving an SMS text message from a brand after opt-in.
Convinced to start using SMS in your Facebook Lead Ad follow-ups? Awesome, let’s walk through how to set up your next campaign in HubSpot.
See how much revenue SMS could add to your HubSpot stack
Five inputs. Industry-backed benchmarks. Get your projected annual SMS revenue in under 30 seconds.
Calculate My SMS ROI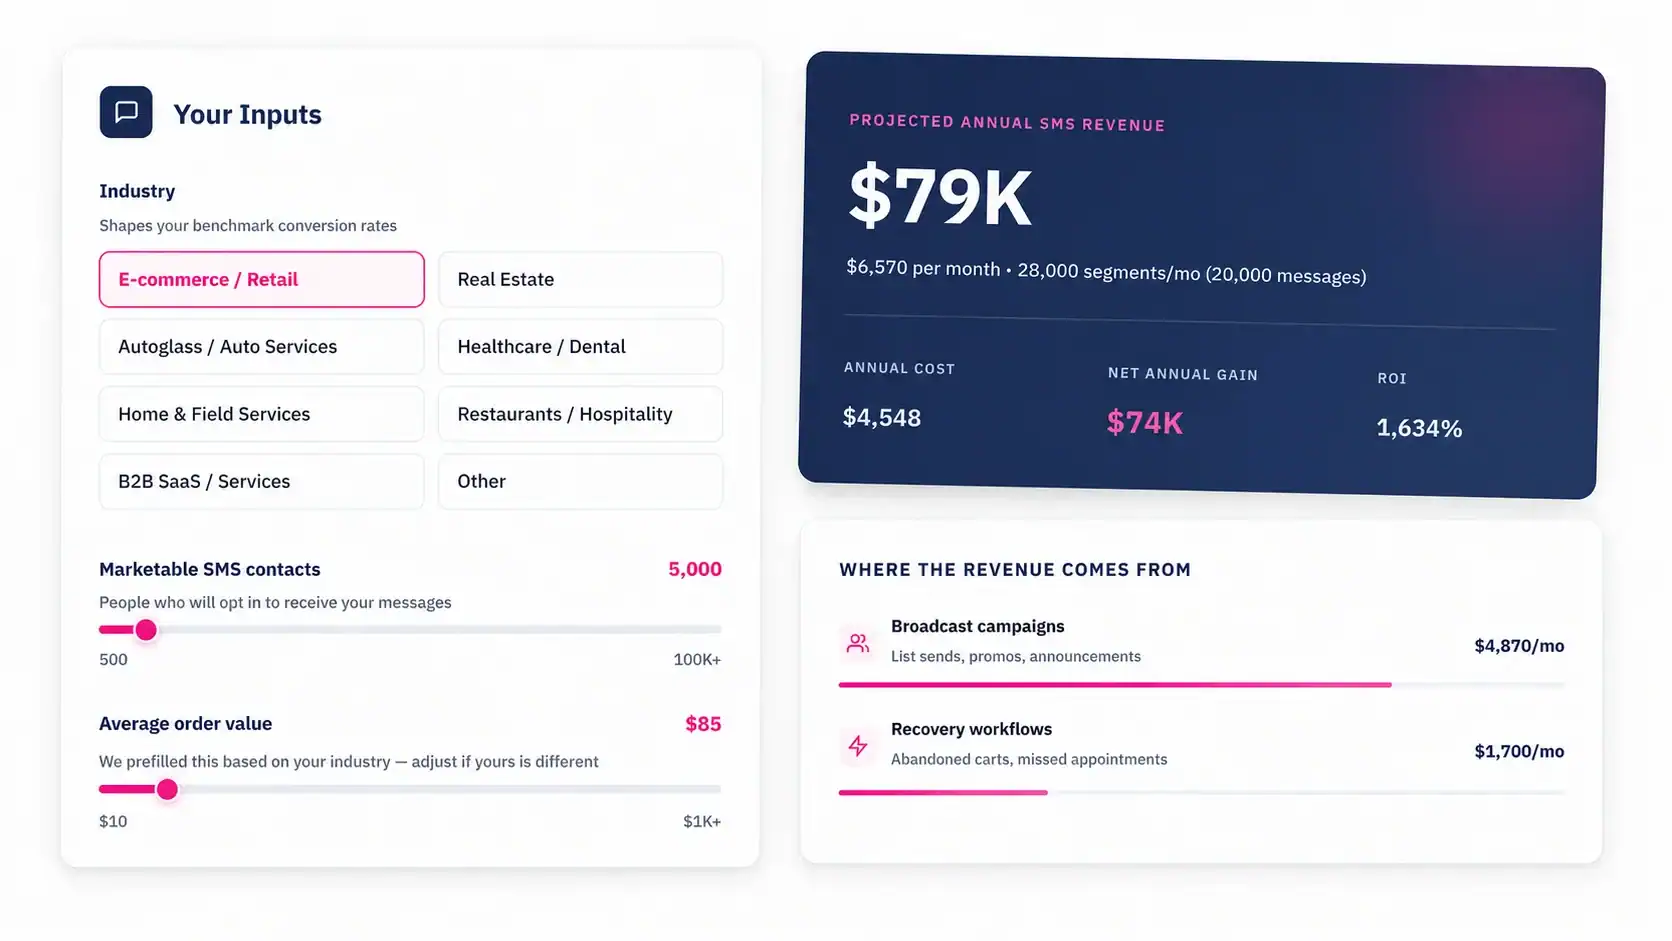
How to set up SMS and Facebook Lead Ads step-by-step
To run Facebook Lead Ads in HubSpot, you’ll need to connect your Facebook Ads account to HubSpot. When a visitor submits a lead ad, HubSpot will create a contact record with the provided information.
Once connected, you can create Facebook Lead Ads in your HubSpot account.
Step 1. Create Lead Ad
- In your HubSpot account, head to Marketing and click ads.
- Click Create ad campaign, then select Facebook Lead generation.
- Click the pencil icon edit at the top of the page to enter a name for your ad.

Step 2. Set up ad creative and choose Facebook form
Design your ad creative and form in the left side panel.
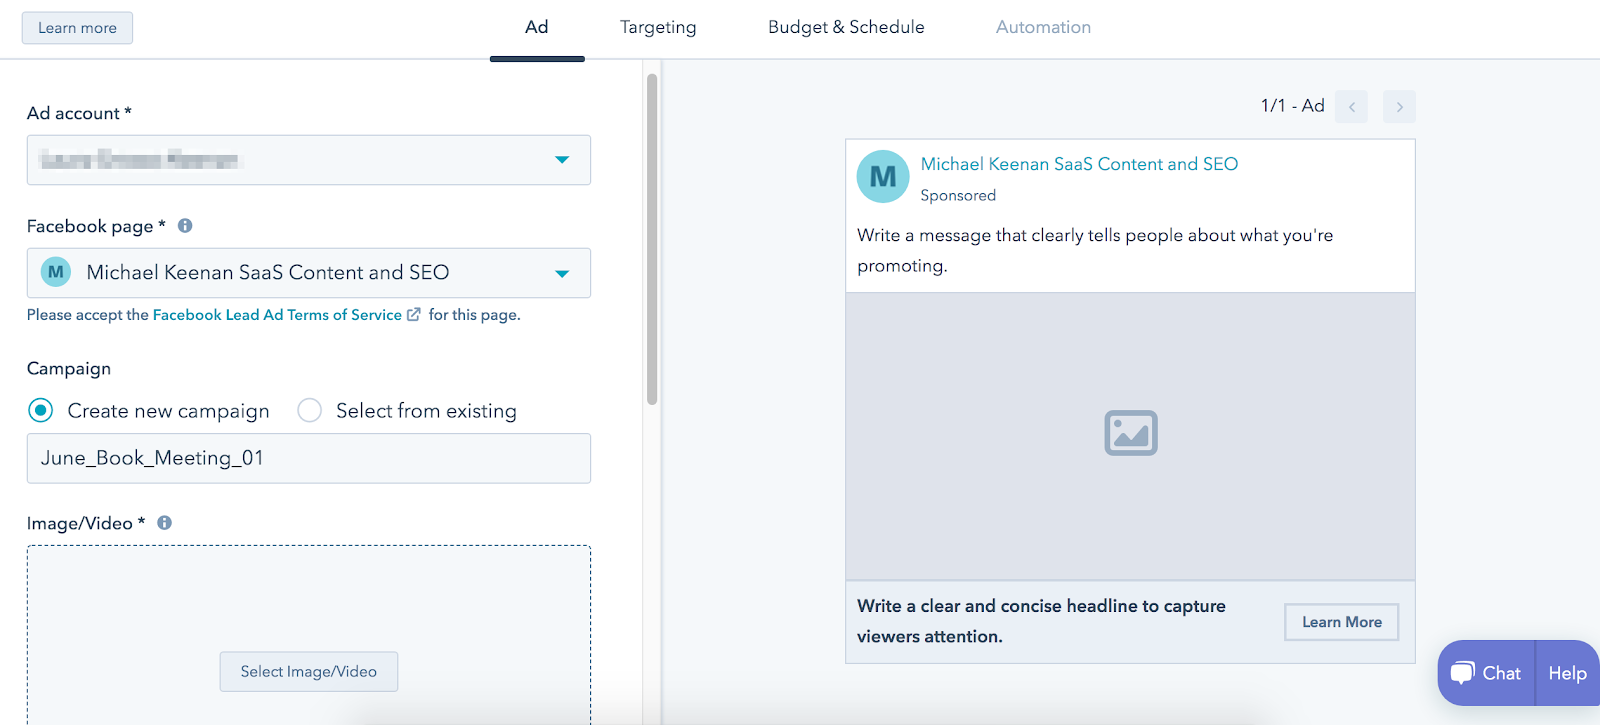
- Ad account. Select the account for the ad you want to create.
- Facebook page. Choose the Facebook page for your ad.
- Image or video. Select an eye-catching image or video for your ad.
- Text. Tell viewers what you’re promoting.
- Headline. Write a clear and memorable headline to grab attention.
- Call-to-action. Choose one of eight call-to-action buttons to get people to click.
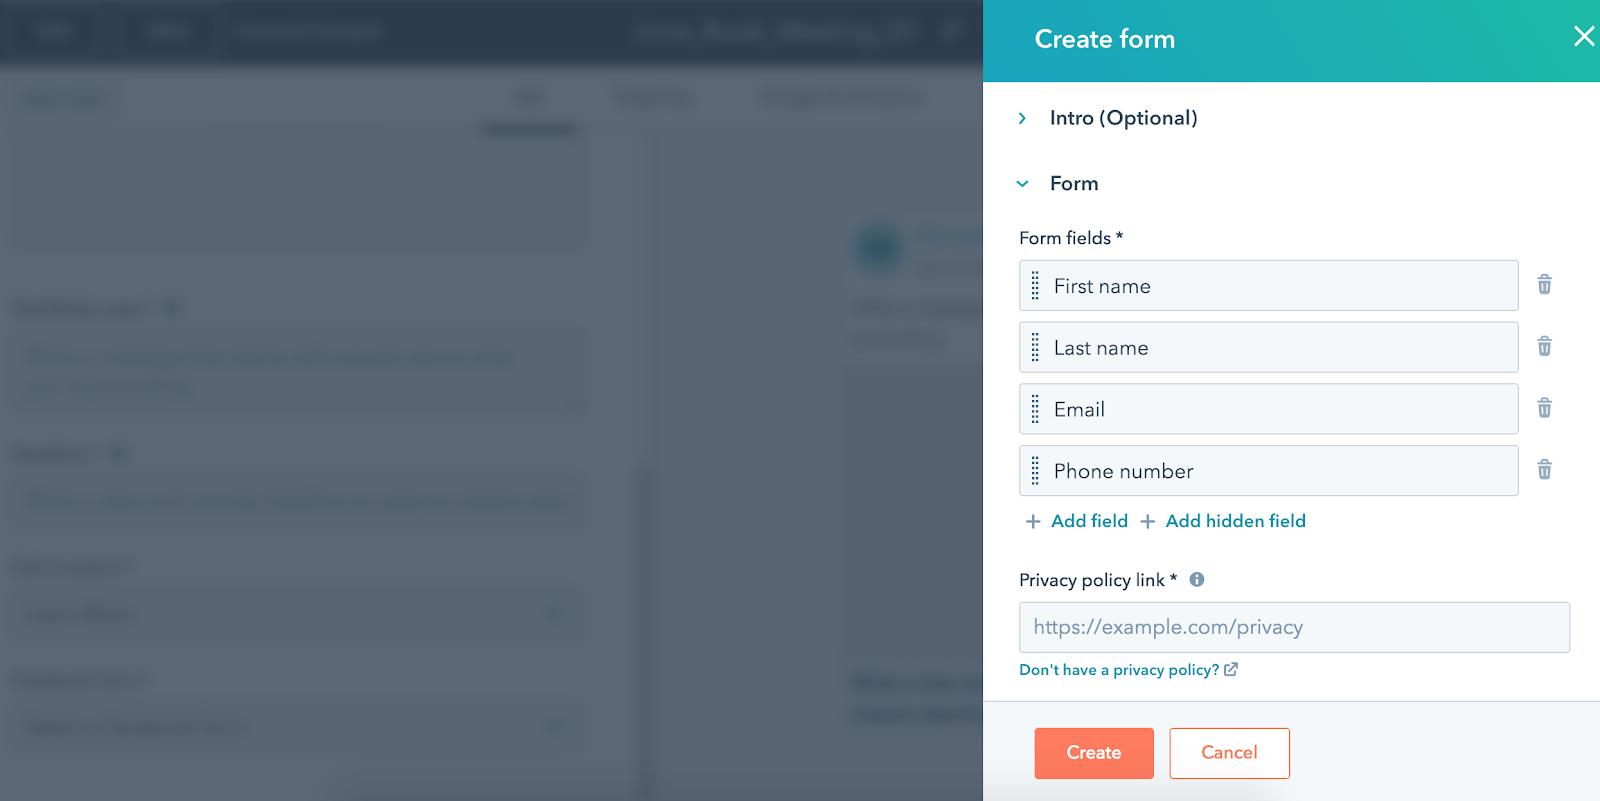
When a visitor clicks the call-to-action button, they’ll automatically get a form to provide additional information. Under the Facebook form dropdown menu, select Create a new Facebook form.
Choose the form field you want someone to submit. Make sure you are collecting their phone number to follow-up with a text message after submitting the form.
Important: As you fill the form, create a custom consent option and add your own terms. Because you are following up with a text message, you want to set expectations for the new lead. This also keeps you in compliance with SMS laws and regulations.
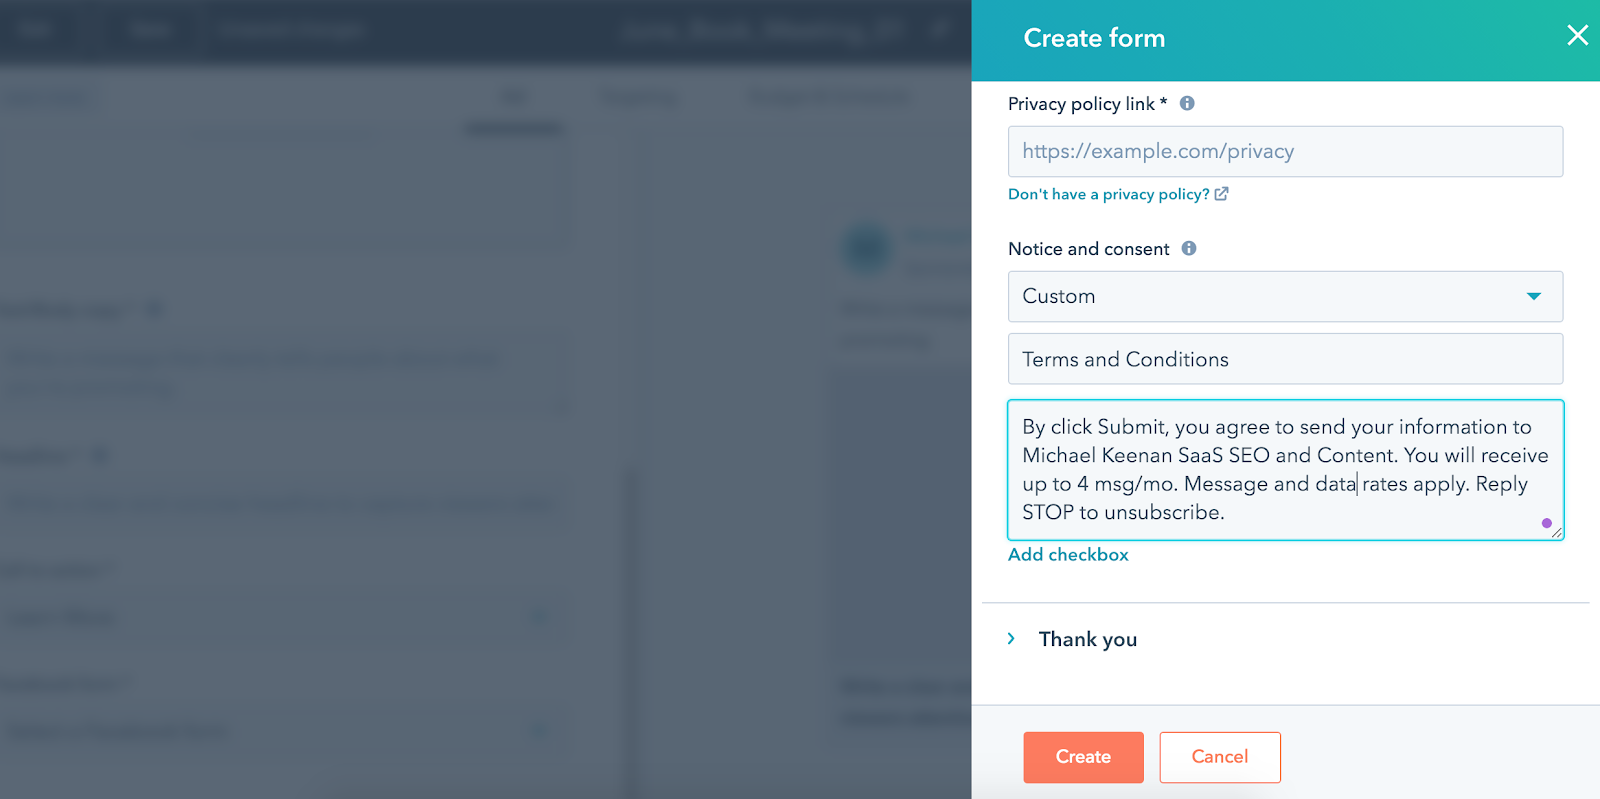
Copy the example we use above:
By click Submit, you agree to send your information to YOUR BUSINESS NAME. You will receive up to 4 msg/mo. Message and data rates apply. Reply STOP to unsubscribe.
After you create your Thank you section, click Create.
Step 3. Choose targeting and budget
Click the Targeting tab and fill out the following fields:
- Custom/saved audience. Select an audience by clicking Add audience in the right panel.
- Location. Choose the location for your ad.
- Interests/Behaviors/Demographics. Refine your audience by selecting specific interests, behaviors, and demographics for the ad.
- Age range. Enter the age range for your ad.
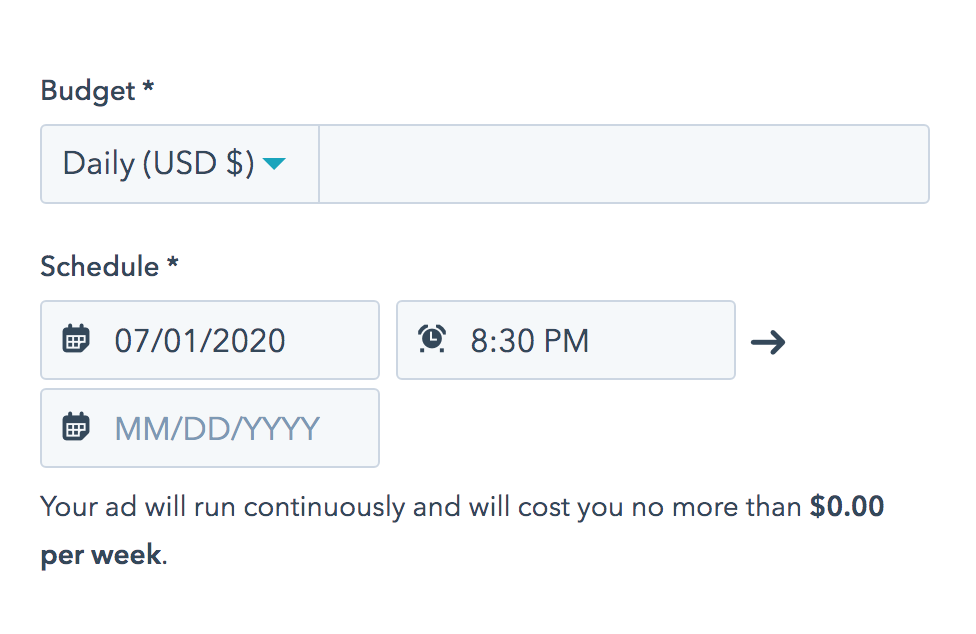
Next, click the Budget & Schedule tab and add the required details.
Step 4. Set up automation
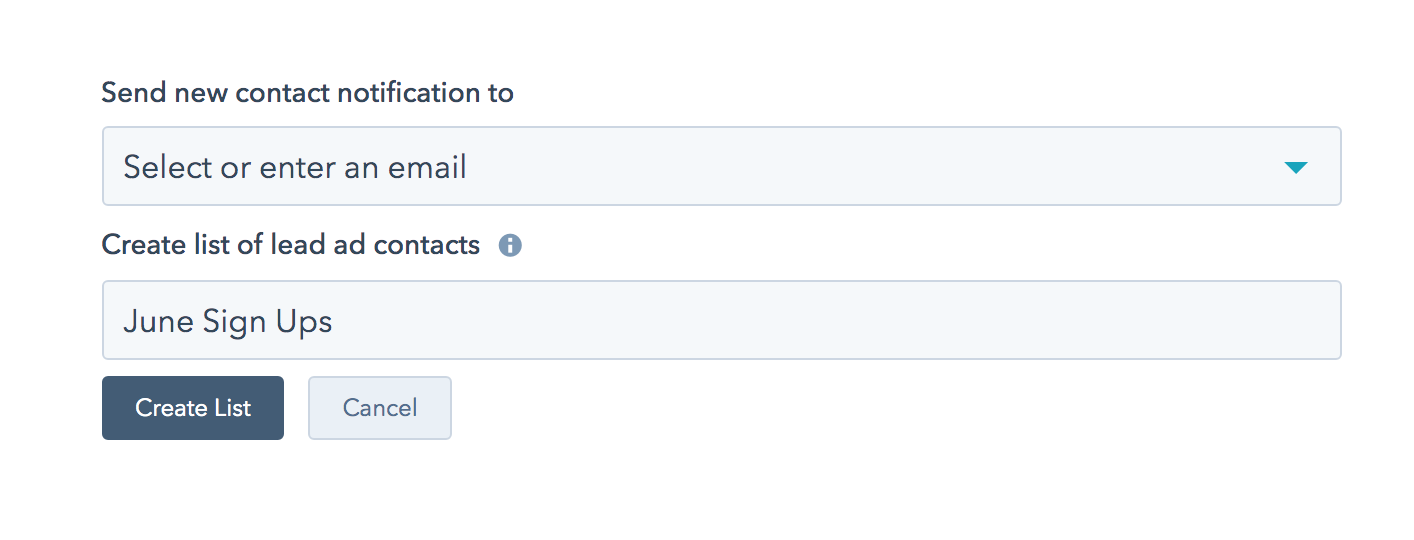
This step is typically optional, but not for you. In the Automation tab, enter a name to create a new list of contacts from your Facebook Lead Ad, then click Create List. You can also send new contact notifications to a new email address if you’d like.
Save your lead ad, then head over to workflows to complete the last step.
Step 5. Create workflow for new leads
In your HubSpot account, create a new workflow and choose your Contact enrollment trigger.
In this example, we’re using a custom trigger through the Reporting Add-on. But you can also start a workflow when someone joins a list, or interacts with a Facebook ad set ID.
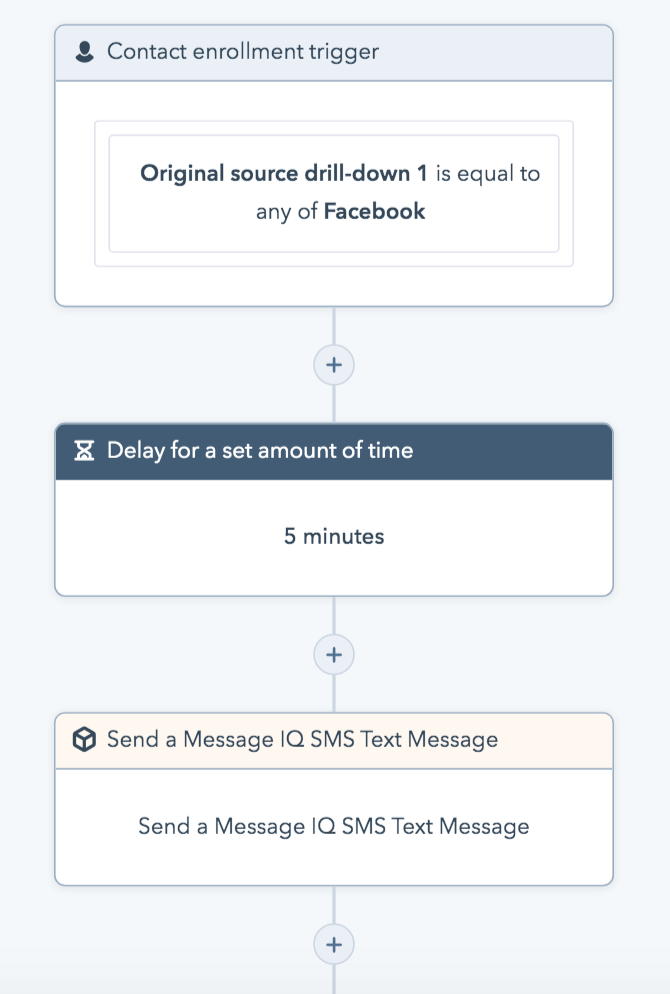
Read more about enrollment triggers in this HubSpot guide.
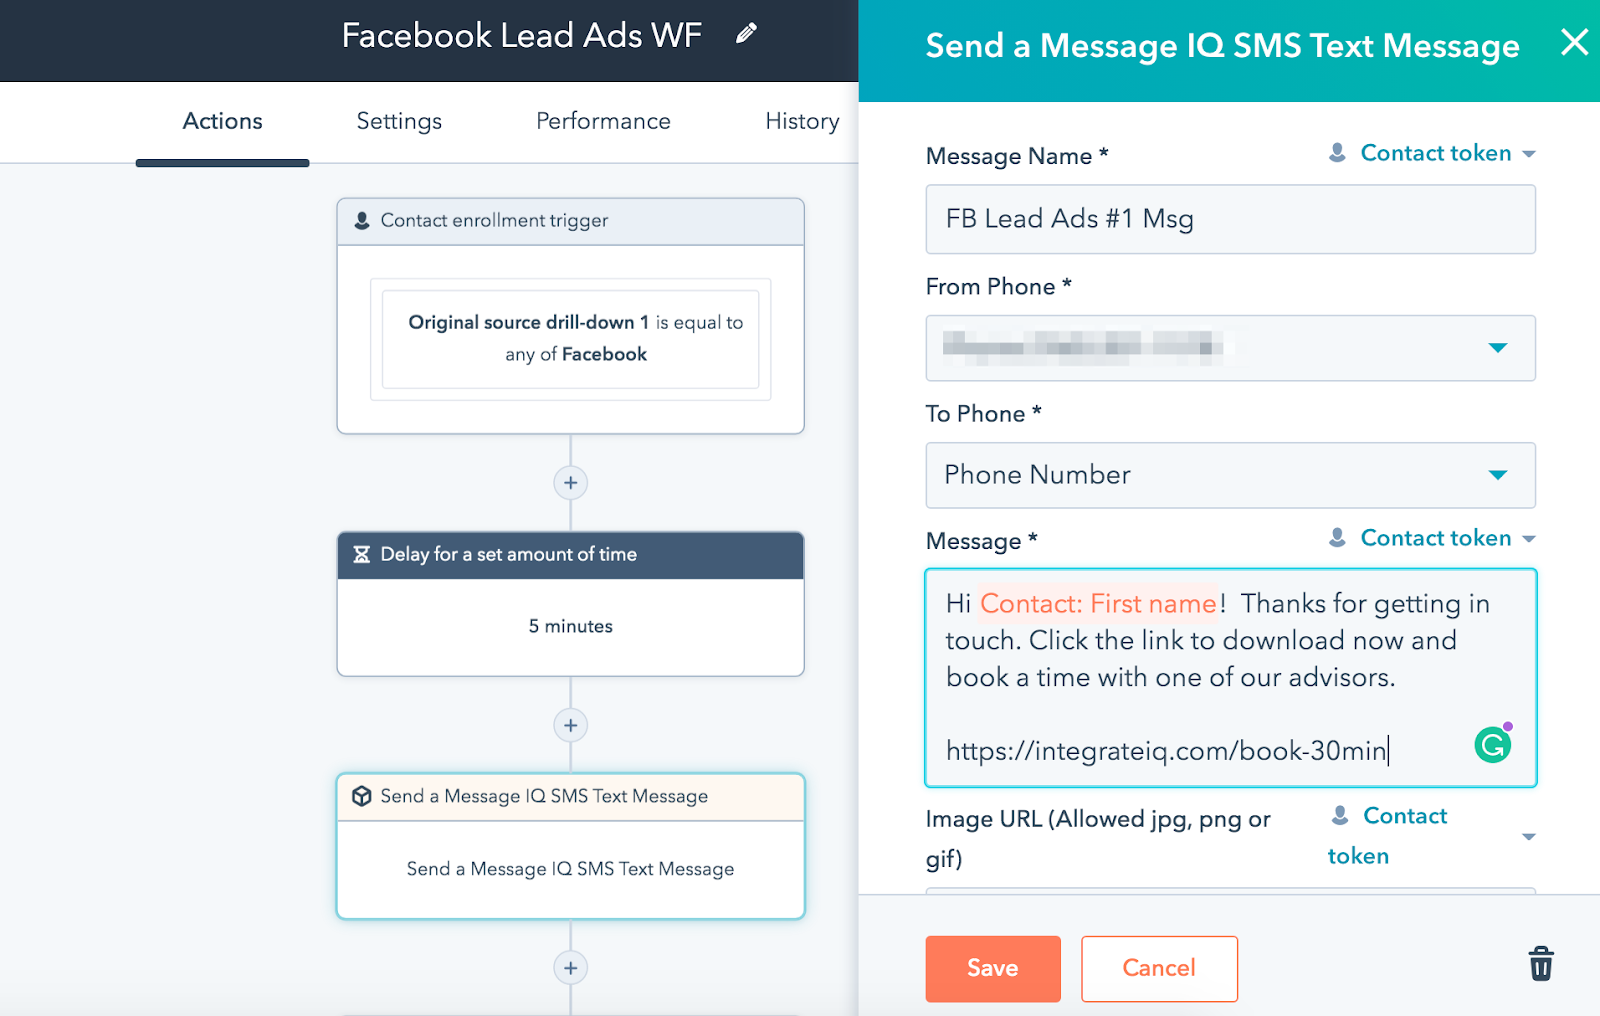
Then create your follow-up message.
Related: 21 Best Text Message Marketing Templates to Drive Leads and Sales
The possibilities are endless from here. If someone responds to your message, you can send an automated message to keep the conversation going.
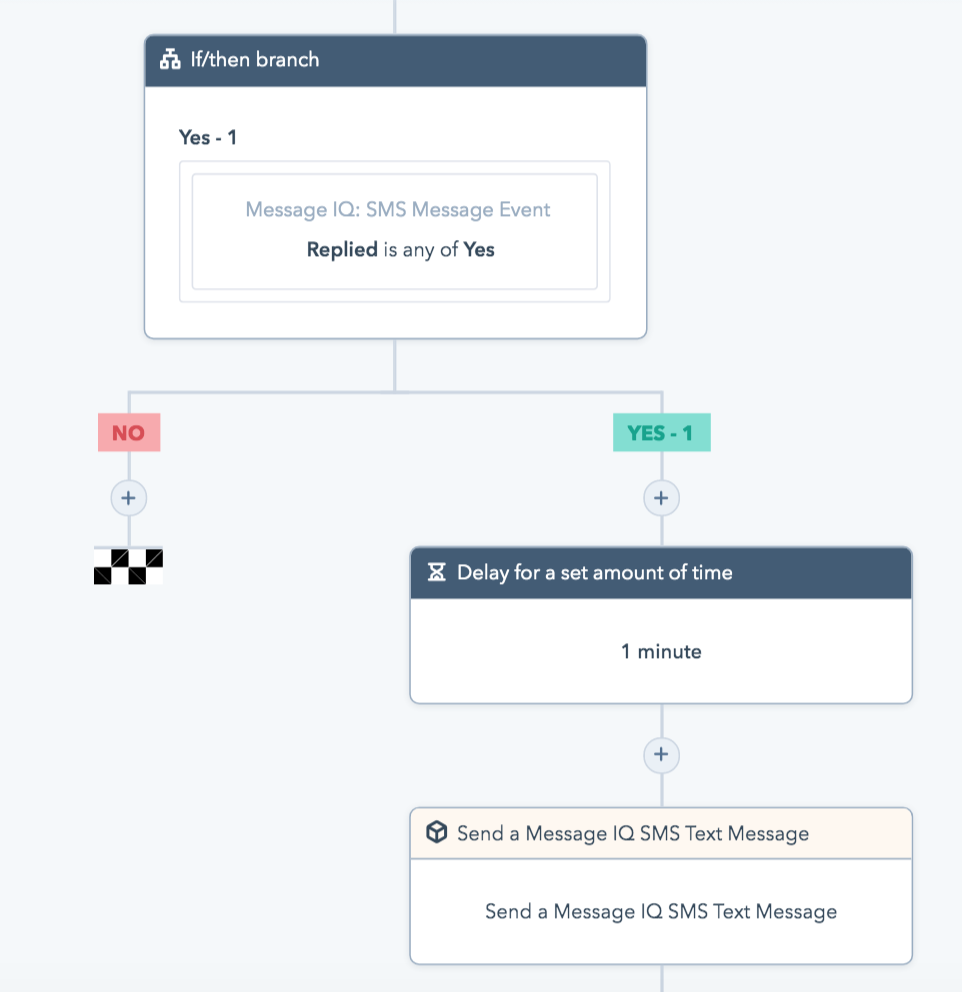
While this is not hard and fast, the above should give you a good idea of the type of automation you can build into your lead generation workflow.
Step 6. Check on your analytics
Tying in with the statement above. If you’re planning to run split tests, you don’t want to drive blind throughout your campaigns.
While it’s important to check on conversions and cost for your Facebook Lead Ads, you should also measure the success of your SMS campaigns.
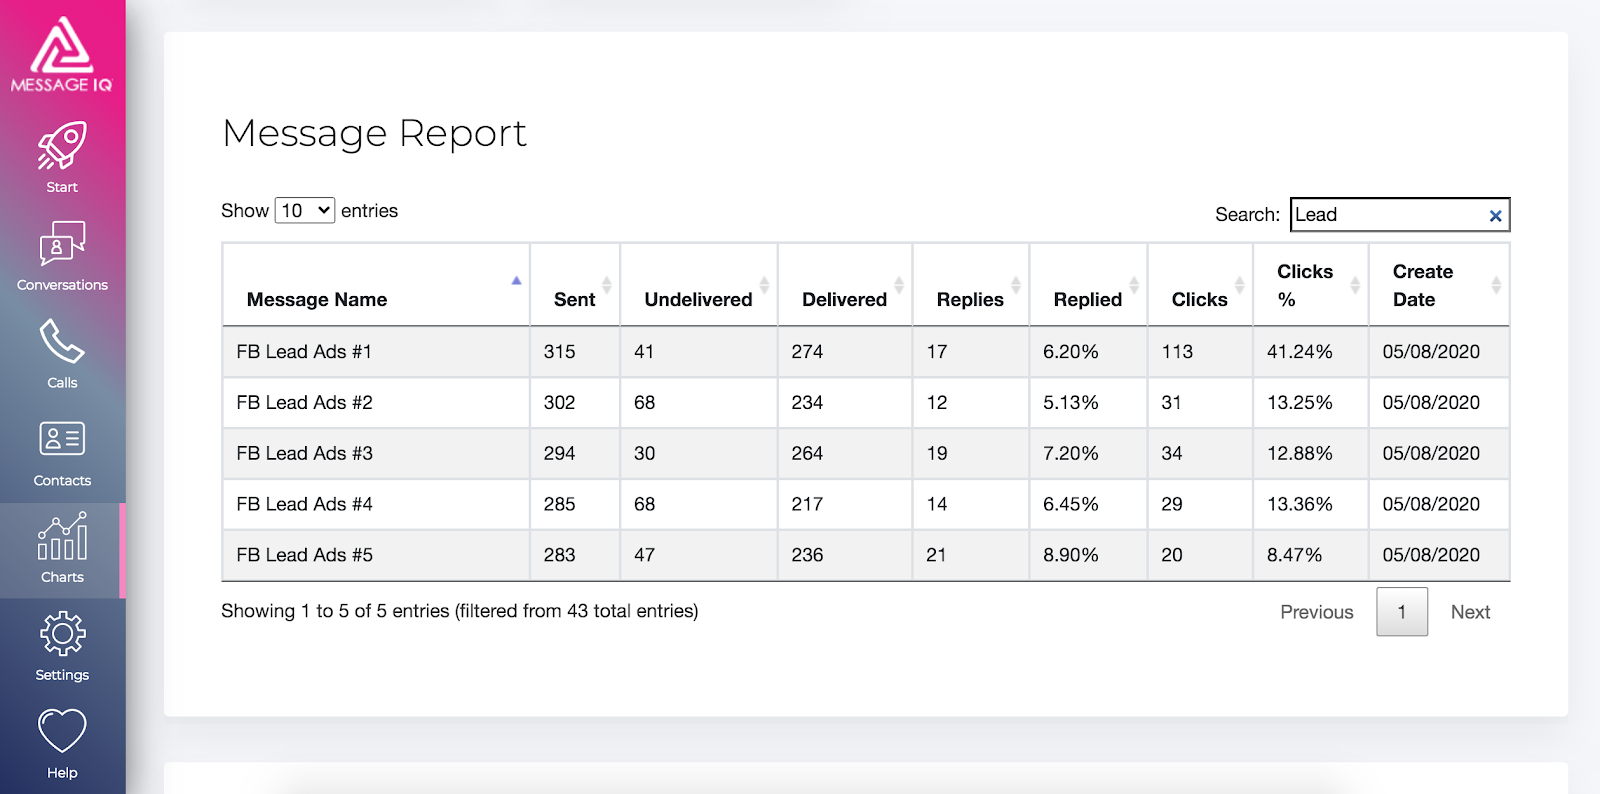
If you don’t check your SMS metrics, you won’t know which messages are performing well. You also can’t uncover ways to improve your messaging or deliverability rate to increase responses.
Turn HubSpot Into A Real-Time SMS Engine with Message IQ
- 98% SMS read within 3 min
- 78% Buy from first responder
- 21× More likely to qualify
*MessageIQ is an Integrate IQ product built natively for HubSpot by the same team.
Final thoughts
Fail to get a response from your Facebook Lead Ad follow-ups, and you won’t close more deals. It’s as simple as that.
Disclaimer: This information is provided for educational purposes only and should not be relied upon as legal advice. Please always consult your own attorney before using text message marketing.

Get 300+ SMS Templates
Enter your details to download the PDF instantly.
Download Started!
Your 300+ SMS Templates PDF is downloading now. If it didn’t start, click here.
The most powerful SMS tool for HubSpot.